Plant Areas are maintained in the Process Setup section under the SmartSolve© Main Menu. The Plant Area object is optional and may be used by Pilgrim customers as an additional area maintained in or outside an Org Unit. Plant Areas are sometimes used to indicate the Area in which a process or product failure was found and sometimes mimic Work Center objects.
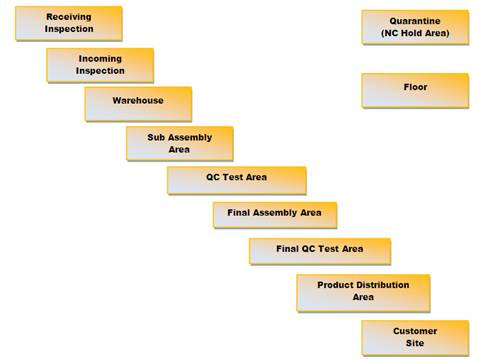
You found a supplier product defect during incoming inspection and record the failure in the Product Exception indicating the Supplier as the possible Org Unit responsible and the Plant/Discovery Area as Incoming Inspection.
Analysis Results - If you are finding that most supplier product defects are discovered during the incoming inspection process, then you are showing that the incoming inspection process is solid.
You found a supplier product defect while retrieving supplier components that have since been moved to the warehouse. You record the failure in the Product Exception indicating the Supplier as the possible Org Unit responsible and the Plant/Discovery Area as Warehouse.
Analysis Results - If you are finding that most supplier product defects are discovered after the incoming inspection process (i.e., in the warehouse or on the floor), then you are showing that the incoming inspection process may need to be corrected.
You clearly found a supplier product defect during QC testing on your manufactured product (which contains the supplied component) and record the failure in the Product Exception indicating the Supplier as the possible Org Unit responsible and the Plant/Discovery Area as QC Inprocess Testing.
Analysis Results - If you are finding that most supplier product defects are discovered during QC Inprocess Testing, then you are showing that the QC Testing process may need to be corrected.
Plant Areas can be used in any of the following SmartSolve© solutions:
SmartSolve© Solution |
Used In |
|
SmartAuditTM |
Yes |
|
SmartCAPATM |
Yes |
|
SmartComplaintsTM |
Yes |
|
SmartDocTM |
Yes |
|
SmartTrainTM |
No |
The following Rights must be assigned to a user to manage or view Plant Areas:
Rights |
Description |
|
PLA_MANAGE |
Allows administrator to Add new object, modify existing object, or delete object.
|
|
PLA_VIEW |
Allows user to access object to View and select.
|
Please see Rights Groups to assign Rights Groups to users.
· Global Plant Areas will be inherited by all Local Organizations.
· Local Plant Areas will only be viewed and used within that Local Organization.
1. From the SmartSolve© tabs select Admin > Setup. Under Process select Plant Area.
The Plant Area list displays.
2. Select Action > Add from the main menu (or right click).
3. Enter Code and Name of your Plant Area.
4. Click the Save button.
The new Plant Area has now been added to the Plant Area list.
Please see Forms Designer if you wish to modify existing Plant Area field controls or add additional field controls
The following options are available within the Plant Area object and can be managed accordingly by an administrator:
Plant Areas can be Edited, Deleted, and Deactivated.
1. From the SmartSolve© tabs select Admin > Setup. Under Process select Plant Area.
The Plant Area list displays.
2. Click the ![]() icon to switch to Local view (if applicable).
icon to switch to Local view (if applicable).
3. Select the check box of the Plant Area to edit, then select Action > Edit from the main menu (or right click).
4. Edit any information for your Plant Area.
5. Click the Save button.
All changes should now be reflected in the Plant Area.
Plant Areas can only be deleted from SmartSolve© if the Plant Area has not been attached to any SmartSolve© records.
1. From the SmartSolve© tabs select Admin > Setup. Under Process select Plant Area.
The Plant Area list displays.
2. Click the ![]() icon to switch to Local view (if applicable).
icon to switch to Local view (if applicable).
3. Select the check box of the Plant Area to delete, then select Action > Delete from the main menu (or right click).
4. Click the Save button.
The Plant Area has now been removed from the system.
Please see Managing Setup Deactivation under SmartSolve Utilities to Deactivate a Plant Area.