Rights Groups group together a specific Groups of Rights that may be associated with a particular function that a User will be assigned in SmartSolve©. Rights can only be assigned to Users through Rights Groups. It is recommended that you create your own Rights Groups for each SmartSolve© application and use the Default Rights Groups that are provided with installation which can be copied into your own specific Rights Groups.
Rights Groups can be created in the GLOBAL Organization and be reused by any Local Organization; or, each Local Organization can create and manage their own Rights Groups.
Rights assigned to a User within a GLOBAL Organization only gives the User access to the GLOBAL Organization. Rights need to be assigned to a User per Organization.
It is best practice to align your Rights Group Names to the names of your system Roles (i.e., Document Owners, Document Approvers, Document Viewers, etc.). This makes maintaining User Management more efficient for the administrator when new Users need to be assigned Roles and Rights Groups.
When creating your Rights Groups, it’s important to start with the Group with the most Rights (i.e., SmartDocTM Administrator). Test the Rights Group with a User; then, create the rest of your Groups by copying the first test Group. Delete all rights not needed for the most recent Group added.
For better Grouping of Rights Groups it is best business practice to add the SmartSolve© solution acronym to the beginning of the Right Group Name (i.e. SD for SmartDocTM, SC for SmartCAPATM, etc.)
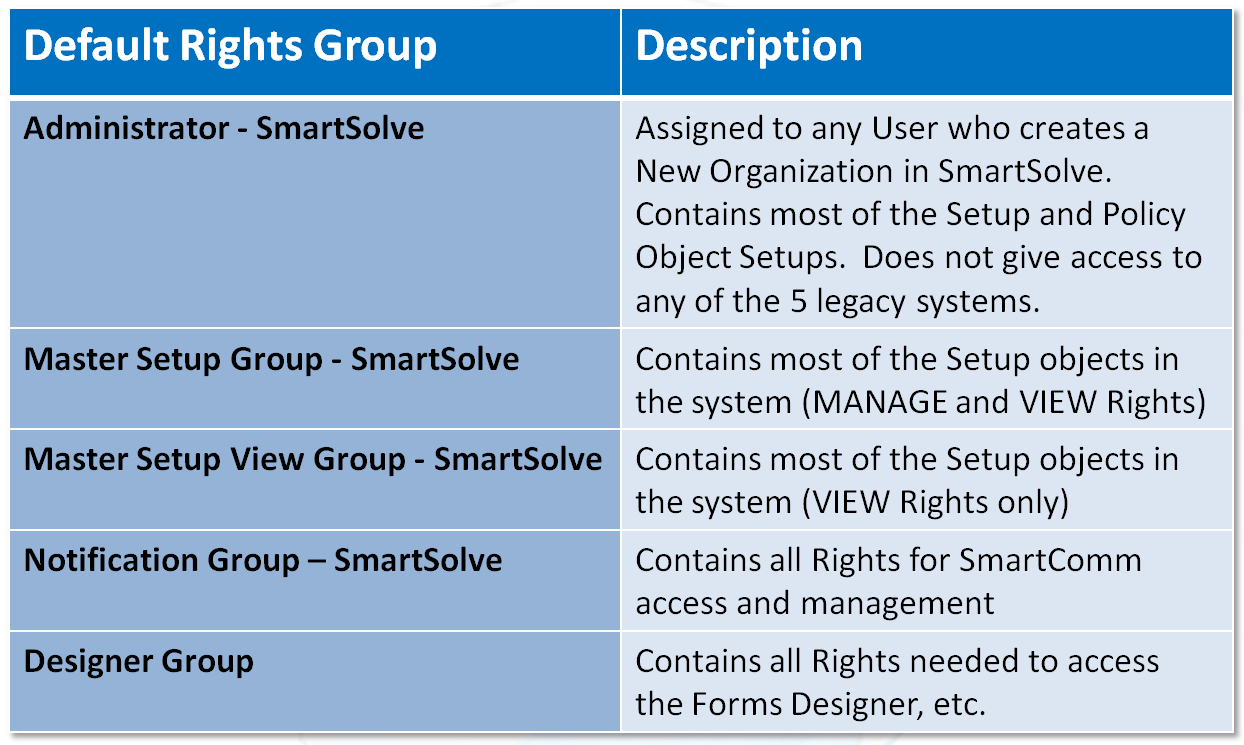
SmartSolve© has default Rights Groups already set up in the system. These Rights Groups can be used two ways:
To be used as a template to copy Rights over to your own Rights Groups (recommended approach).
To assign to users directly (not recommended).
|
NOTE: When assigning defaults rights groups directly to users you may be assigning rights to a user that are not required. Also, default rights groups assigned to a user may acquire additional rights after an upgrade of SmartSolve© occurs. |
These Rights Groups are typically used over again for SmartSolve© implementations as templates for configuring customer specific Rights Groups:

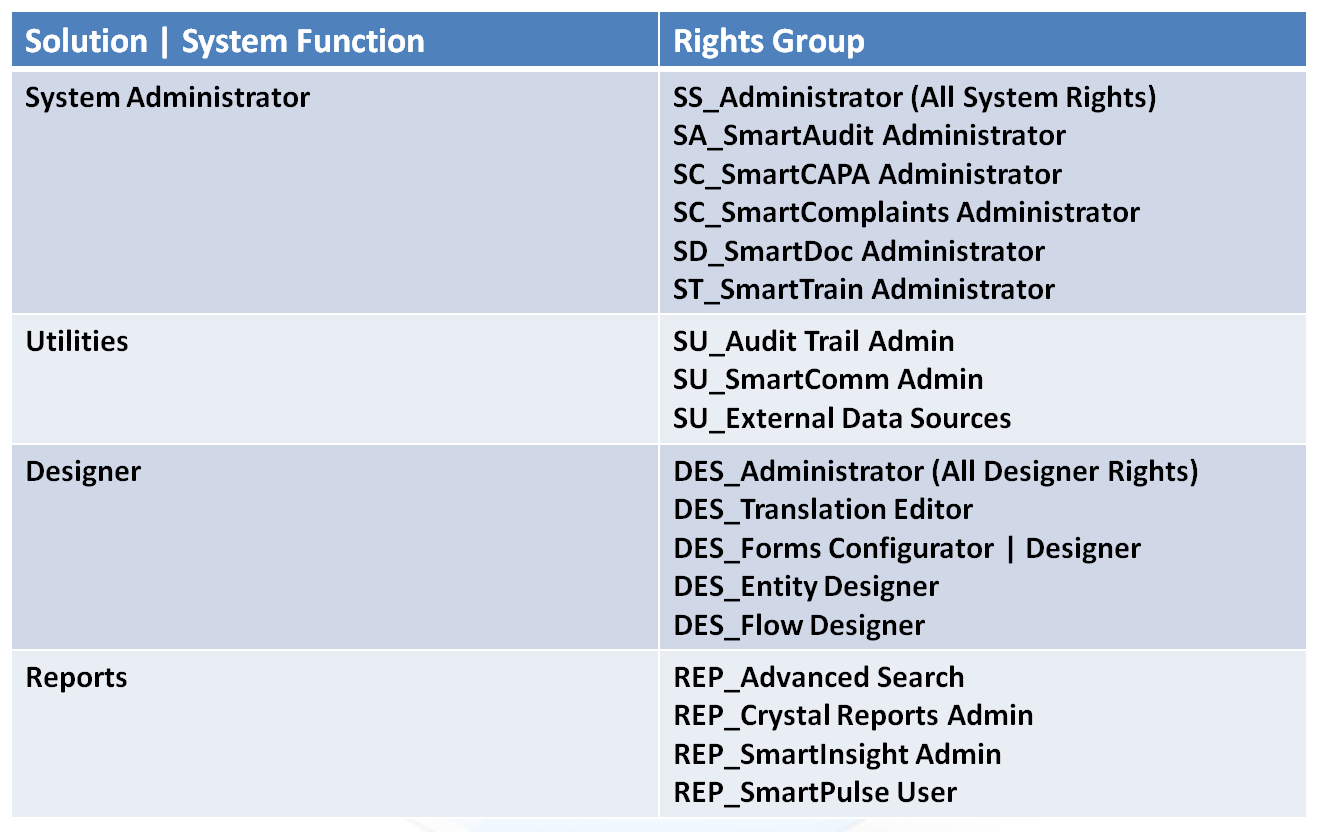
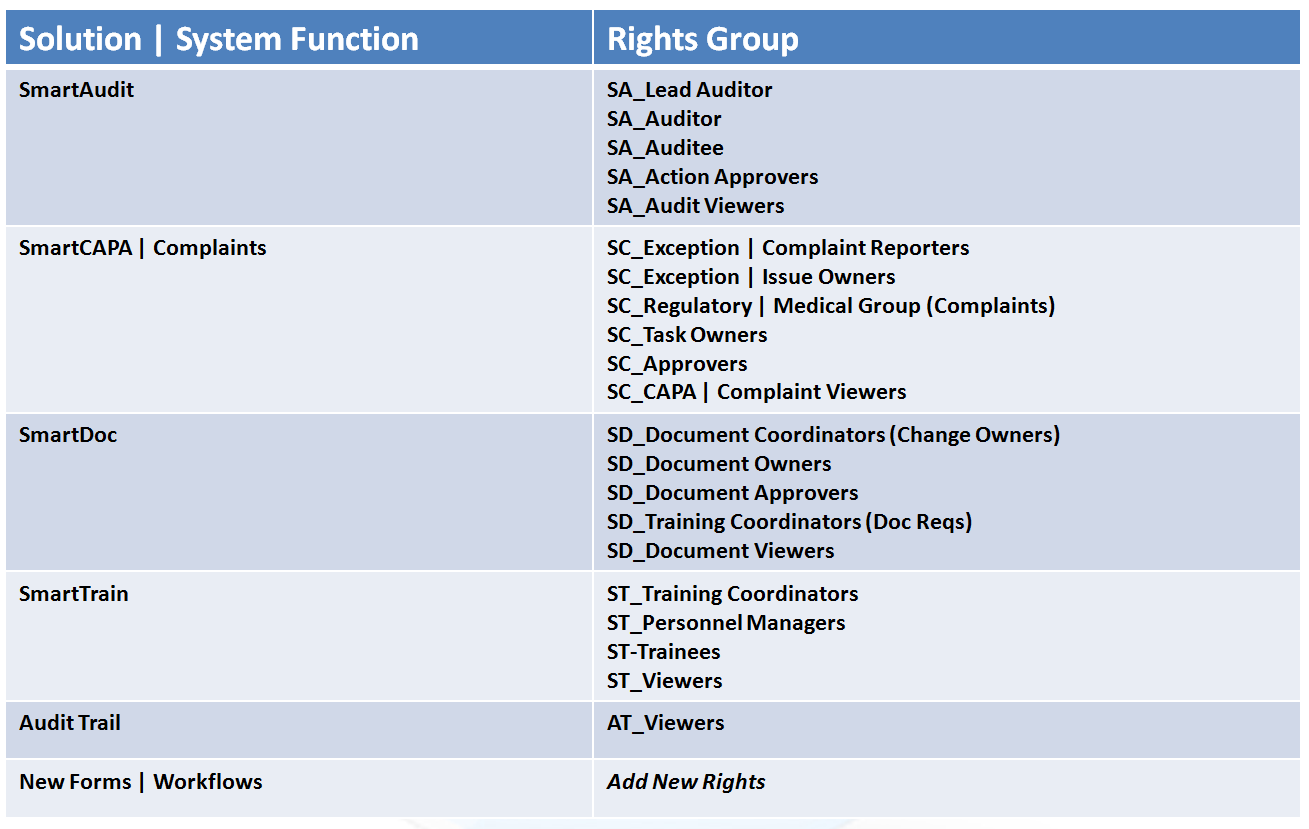
The following section contains recommended Rights Groups that are categorized by SmartSolve© solution. These Rights Groups are based on best practices across various Customer SmartSolve© implementations. If needed, you can Import these Rights Groups into your SmartSolve© system.
|
NOTE: Please contact your Pilgrim Representative to receive a copy of recommended Rights Groups that can be imported into your SmartSolve© solution and modified and/or used in your implementation. |
If you wish to setup rights to be assigned to a Super User or high level Admin, it is recommended you create your own Super User Administrator Right Group and attach all rights with the exception of the following Rights which you should note:
RESTRICT_ORG_UNIT
VIEW_PORTAL - no longer used with SmartSolve©.
|
NOTE: It is very important you make sure neither of the Rights above are attached to your new Rights Group. It is recommended you assign this rights group to another user other than your SmartAdmin to test that these rights have been applied successfully. |


The following rights must be assigned to a user to manage or view Rights Groups:
Rights |
Description |
|
RGP_MANAGE |
Allows administrator to add new object, modify existing object, or delete object.
|
|
RGP_VIEW |
Allows user to access object to view and select.
|
· Global Rights Groups will be inherited by all Local Organizations.
· Local Rights Groups will only be viewed and used within that Local Organization.
1. Log into the appropriate Organization.
2. From the SmartSolve© tabs select Admin. Select Rights Group from User Management.
The Rights Group list will now appear to the right of the console.
3. Select Action > Add from the main menu (or right click).
4. Enter the Name of your Rights Group.
5. Click the Save button.
The new Right Group has now been added to the Rights Group list and the Detail of the Rights Group is displayed.
There are two ways to add Rights to a Rights Group. The administrator can add Rights by searching for and selecting all Rights that will apply to the Group, or by Copying Rights from an existing Rights Group and removing any Rights (if applicable) that would not apply.
1. Log into the appropriate Organization.
2. From the SmartSolve© tabs select Admin. Select Rights Group from User Management.
The Rights Group list will now appear to the right of the console.
3. Select the Rights Group for which Rights will be added by left clicking over the Name.
4. From the Right Group select the Rights tab.
5. Select Action > Add from the main menu (or right click).
6. From the Search panel at the bottom of the list enter Search options to search for Rights.
Some suggestions for locating Rights:
Open up the Saved Search option and setup some Saved Searches to group together Rights. You can also expand the count of Rights displayed in the list (instead of viewing 10 Rights on the page you can view 100). Please see Saved Searches.
Search for Rights using Right Name > Contains. Enter record type (i.e., Document, Issue) or right type (i.e., Create, Manage, View, Delete, etc.).
7. Check off each Right needed and click on the Select option (you can Search for and check off multiple Rights before selecting).
All Rights selected are added to the Rights Group
1. Log into the appropriate Organization.
2. From the SmartSolve© tabs select Admin. Select Rights Group from User Management.
The Rights Group list will now appear to the right of the console.
3. Select the Rights Group for which Rights will be added by left clicking over the Name.
4. From the Right Group select the Rights tab.
5. Select Action > Copy from the main menu (or right click).
The Group Right window displays.
6. Zoom from the Right Group Name field and select the Right Group which will contain the Rights you wish to Copy over to your new Rights Group.
The Rights Group is added to the Right Group Name field.
7. Click the Save button.
All Rights from the Copied Rights Group are added to the new Rights Group.
Please see Forms Designer to modify existing Actor field controls or add additional field controls.
The following options are available within Rights Groups and can be managed accordingly by an administrator:
Rights Groups can be edited and/or deleted.
A Rights Group can be attached to multiple Users. Please see How to Attach Multiple Users to a Single Rights Group for more information.
Multiple Rights Groups can be assigned to a Single User. Please see How to Attach Multiple Rights Groups to a Single User for more information.
1. Log into the appropriate Organization.
2. From the SmartSolve© tabs select Admin. Select Rights Group from User Management.
The Rights Group list will now appear to the right of the console.
3. Select the check box of the Rights Group to edit then select Action > Edit from the main menu (or right click).
| NOTE: Rights Groups can only be edited from the |
4. Edit any information for your Rights Group.
5. Click the Save button.
All changes should now be reflected in the Rights Group.
Rights Groups can only be deleted from SmartSolve© if the Rights Group is not currently attached to any SmartSolve© users.
1. Log into the appropriate Organization.
2. From the SmartSolve© tabs select Admin. Select Rights Group from User Management.
The Rights Group list will now appear to the right of the console.
3. Select the check box of the Rights Group to delete then select Action > Delete from the main menu (or right click).
| NOTE: Rights Groups can only be deleted from the |
4. Click the Save button.
The Rights Group has now been removed from the system.
Multiple Users can be assigned to a Rights Group from the Rights Group record by selecting the Users tab. Use this option if you need to attach multiple Users to a single Rights Group.
1. Log into the appropriate Organization where the Users will be assigned to the Rights Group.
2. From the SmartSolve© tabs select Admin. Select Rights Group from User Management.
The Rights Group list will now appear to the right of the console.
If you wish to attach a Shared Rights Group select the ![]() icon to view Shared Rights Groups.
icon to view Shared Rights Groups.
3. Select the Rights Group for which Users will be added by left clicking over the Name.
4. From the Right Group select the Users tab.
All Internal Actors currently assigned to this Rights Group within this Organization will display in the top half of the Users page under the Current Actors (Users) section. Use the Select User option to view Persons (SmartTrainTM) and Client Contacts if you wish to assign these types of Users rather than Internal Actors).

5. Scroll to the bottom of the Users page to view all Available Actors (Users) who can be attached to this Rights Group.
| NOTE: If an administrator needs to search for Users by a different Organization, the administrator has an option to select the |
6. From the Available Actors list check off all Users who will be attached to this Rights Group.
7. Click on the ![]() button to attach selected Users to the Rights Group.
button to attach selected Users to the Rights Group.
8. Scroll to the top of the Users page.
All Users selected are attached to the Rights Group.
Please see How to Attach Multiple Rights Groups to a Single User.
Multiple Users can be removed from a Rights Group from the Rights Group record by using the Users tab. Use this option if you need to remove multiple Users from a single Rights Group.
1. Log into the appropriate Organization where the Users will be assigned to the Rights Group.
2. From the SmartSolve© tabs select Admin. Select Rights Group from User Management.
The Rights Group list will now appear to the right of the console.
3. If you wish to remove Users from a Shared Rights Group select the ![]() icon to view Shared Rights Groups.
icon to view Shared Rights Groups.
4. Select the Rights Group for which Users will be removed from by left clicking over the Name.
5. From the Right Group select the Users tab.
All Internal Actors currently assigned to this Rights Group within this Organization will display in the top half of the Users page under the Current Actors (Users) section. . Use the Select User option to view Persons (SmartTrainTM) and Client Contacts if you wish to assign these types of Users rather than Internal Actors).

6. From the Current Actors list check off all Users who will be removed from this Rights Group.
7. Click on the ![]() button to remove selected Users from the Rights Group.
button to remove selected Users from the Rights Group.
All Users selected are removed from the Rights Group.
Please see How to Remove Multiple Rights Groups from a Single User