Object |
Shared with other SmartSolve© Applications |
Required for SmartTrainTM |
|
No |
Yes |
|
|
Yes |
Yes |
|
|
No |
Yes |
|
|
No |
Yes |
|
|
No |
Yes |
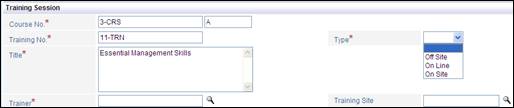
A training type (such as on site and off site) is required for each training session. The Training Type is used to filter different types of trainings when conducting searches in the system. The system comes with the following default Training Types and more can be added if needed:
· Onsite Training
· Offsite Training
· Online Training
The following rights must be assigned to a user to manage or view training types:
Rights |
Description |
|
TRT_MANAGE |
Allows administrator to add new training types, modify existing training types, or delete training types.
|
|
TRT_VIEW |
Allows user to access training types to view and select.
|
Please see Rights Groups to assign Rights Groups to users.
· Global Training Types will be inherited by all local organizations.
· Local Training Types will only be viewed and used within that local organization.
1. From the SmartSolve© tabs select Admin >Setup. Select Training Type under Training.
2. Right click and select Add then enter a new Training Type.
3. Click the Save button.
Training Types can be edited and deleted and can be managed accordingly by an administrator.
1. From the SmartSolve© tabs select Admin >Setup. Select Training Type under Training.
The Training Type list displays.
2. Click the ![]() icon to switch to local view (if applicable).
icon to switch to local view (if applicable).
3. Select the check box of the Training Type to edit, then select Action > Edit from the main menu (or right click).
4. Edit any information for your Training Type.
5. Click the Save button.
All changes should now be reflected in the list.
Training Types can only be deleted from SmartSolve© if the training type has not been attached to any SmartSolve© records.
1. From the SmartSolve© tabs select Admin >Setup. Select Training Type under Training.
The Training Type list displays.
2. Click the ![]() icon to switch to local view (if applicable).
icon to switch to local view (if applicable).
3. Select the check box of the Training Type to delete, then select Action > Delete from the main menu (or right click).
4. Click the Save button.
The object has now been removed from the system.
Please see Numbering Scheme under System Wide Setup.
The training status indicates the state (phase) of a training session. The following Statuses come as defaults in the system and can be changed if you wish to apply your own terminology.
Status |
Description |
|
INWORKS |
The training session is being created |
|
SIGNUP OPEN |
The training session is open for signup and can be viewed in the schedule |
|
SIGNUP CLOSE |
The training session is closed for signup |
|
WAITING FOR RESULT |
The training session has been completed, but has not been closed because the assessment or manual results have not been posted. |
|
CLOSED |
The training session is closed, meaning the results have been posted. |
|
ABORTED |
The training session cannot be used |
The following rights must be assigned to a user to manage or view training statuses:
Rights |
Description |
|
TRS_MANAGE |
Allows administrator to add new training statuses, modify existing training statuses, or delete training statuses.
|
|
TRS_VIEW |
Allows user to access training statuses to view and select.
|
Please see Rights Groups to assign Rights Groups to users.
· Global Training Statuses will be inherited by all local organizations.
· Local Training Statuses will only be viewed and used within that local organization.
1. From the SmartSolve© tabs select Admin > Setup. Select Training Status under Training.
2. Right click and select Add.
3. Enter information in the following fields:
Fields |
Description |
|
Status |
Enter a secondary status. |
|
Primary Status |
From the drop down select the appropriate primary status. |
|
Add Another |
Click this box to add another course status. |
4. Click the Save button.
Training statuses can be edited and deleted within training status and be managed accordingly by an administrator.
1. From the SmartSolve© tabs select Admin > Setup. Select Training Status under Training.
The Training Statuses list displays.
2. Click the ![]() icon to switch to local view (if applicable).
icon to switch to local view (if applicable).
3. Select the check box of the Training Status to edit, then select Action > Edit from the main menu (or right click).
4. Edit any information for your Training Status.
5. Click the Save button.
All changes should now be reflected in the list.
Training statuses can only be deleted from SmartSolve© if the status has not been attached to any SmartSolve© records.
1. From the SmartSolve© tabs select Admin > Setup. Select Training Status under Training.
The Training Statuses list displays.
2. Click the ![]() icon to switch to local view (if applicable).
icon to switch to local view (if applicable).
3. Select the check box of the Training Status to delete, then select Action > Delete from the main menu (or right click).
4. Click the Save button.
The object has now been removed from the system.
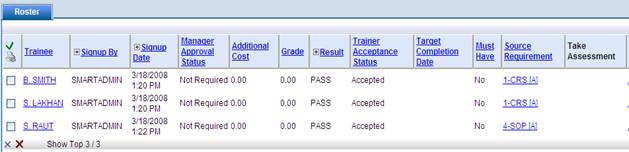
Training Results indicate the manual entry of pass or fail from a training coordinator, or the results of an assessment based on pass/fail parameters that you configure. The Primary Results (Pass and Fail) cannot be changed; however, a primary result can have multiple secondary results (i.e., 70 = Pass, 60 = Fail).
The following rights must be assigned to a user to manage or view training results:
Rights |
Description |
|
TTR_MANAGE |
Allows administrator to add new training results, modify existing training results, or delete training results.
|
|
TTR_VIEW |
Allows user to access training results to view and select.
|
Please see Rights Groups to assign Rights Groups to users.
· Global Training Results will be inherited by all local organizations.
· Local Training Results will only be viewed and used within that local organization.
1. From the SmartSolve© tabs select Admin > Setup. Select Training Result under Training.
The Training Results list appears.
2. Right click and select Add.
3. In the Result field, enter a training Result.
4. From the Primary Result drop down list choose the appropriate primary result:
PASS or FAIL.
5. Click the Save button.
Training Results can be edited and deleted and can be managed accordingly by an administrator.
1. From the SmartSolve© tabs select Admin > Setup. Select Training Result under Training.
The Training Result list displays.
2. Click the ![]() icon to switch to local view (if applicable).
icon to switch to local view (if applicable).
3. Select the check box of the Training Result to edit, then select Action > Edit from the main menu (or right click).
4. Edit any information for your Training Result.
5. Click the Save button.
All changes should now be reflected in the list.
Training Results can only be deleted from SmartSolve© if the training result has not been attached to any SmartSolve© records.
1. From the SmartSolve© tabs select Admin > Setup. Select Training Result under Training.
The Training Result list displays.
2. Click the ![]() icon to switch to local view (if applicable).
icon to switch to local view (if applicable).
3. Select the check box of the Training Result to delete, then select Action > Delete from the main menu (or right click).
4. Click the Save button.
The object has now been removed from the system.
Training Sites are not required when creating Training Sessions. However, if you wish to identify where the Training Sessions will be held, when your employees sign up for classes, then setup your training sites under this setup table.
The following rights must be assigned to a user to manage or view training sites:
Rights |
Description |
|
STE_MANAGE |
Allows administrator to add new training sites, modify existing training sites, or delete training sites.
|
|
STE_VIEW |
Allows user to access training sites to view and select.
|
Please see Rights Groups to assign Rights Groups to users.
· Global Training Sites will be inherited by all local organizations.
· Local Training Sites will only be viewed and used within that local organization.
1. From the SmartSolve© tabs select Admin > Setup. Select Training Site under Training.
2. Right click and select Add then enter a new Training Site.
3. Click the Save button.
Training Sites can be edited and deleted and can be managed accordingly by an administrator.
1. From the SmartSolve© tabs select Admin > Setup. Select Training Site under Training.
The Training Site list displays.
2. Click the ![]() icon to switch to local view (if applicable).
icon to switch to local view (if applicable).
3. Select the check box of the Training Site to edit, then select Action > Edit from the main menu (or right click).
4. Edit any information for your Training Site.
5. Click the Save button.
All changes should now be reflected in the list.
Training Sites can only be deleted from SmartSolve© if the training site has not been attached to any SmartSolve© records.
1. From the SmartSolve© tabs select Admin > Setup. Select Training Site under Training.
The Training Site list displays.
2. Click the ![]() icon to switch to local view (if applicable).
icon to switch to local view (if applicable).
3. Select the check box of the Training Site to delete, then select Action > Delete from the main menu (or right click).
4. Click the Save button.
The object has now been removed from the system.